

How to Fix a Leaking Delta Shower Head
If your Delta shower head is leaking, don’t worry—fixing it can be a straightforward process! Whether it's a minor drip or a steady leak, addressing the issue quickly can help prevent water waste and potential damage. This guide will walk you through the most common causes of a leaking shower head and how to repair them. If you’re unsure about any step, don’t hesitate to consult a professional plumber for assistance.
Common Causes of a Leaking Delta Shower Head
Several factors can lead to leaks in your Delta shower head, including:
- Worn or damaged O-rings – Over time, the rubber O-rings that create a watertight seal between the shower head and the pipe can deteriorate, leading to leaks.
- Faulty washers – Washers help maintain a tight seal. If they become worn, water can seep through.
- Mineral buildup – Hard water can cause mineral deposits to accumulate inside the shower head, leading to blockages and leaks.
- Cracked shower head – Physical damage, such as cracks or fractures, can allow water to escape.
- Improper installation – If the shower head wasn’t installed correctly, it might not be sealed properly, leading to leaks.
- Worn shower valve – Sometimes, the issue isn’t the shower head itself but the valve behind the wall. A faulty or worn-out shower valve can cause water to continuously drip from the shower head.
How to Fix a Leaking Delta Shower Head
Now that you know the potential causes, let’s go over the steps to fix them.
1. Replacing Worn O-Rings
This is one of the simplest fixes and can be done in a few minutes.
Steps:
- Turn off the water supply to avoid getting soaked.
- Use a wrench to carefully unscrew the shower head from the pipe.
- Locate the O-rings inside the connection point and inspect them for wear or damage.
- Remove the old O-rings and replace them with new ones. Be sure to use the correct size to ensure a proper seal.
- Reattach the shower head and turn the water back on to check for leaks.
2. Replacing Faulty Washers
If O-rings aren’t the problem, the washers may need replacing.
Steps:
- Remove the shower head and disassemble it (if applicable).
- Locate the rubber washers inside the fixture.
- Replace the worn washers with new ones of the same size.
- Reassemble and reattach the shower head.
3. Cleaning Mineral Deposits
Hard water buildup can lead to leaks by blocking the water flow, increasing pressure inside the shower head.
Steps:
- Remove the shower head.
- Soak it in a bowl of white vinegar for a few hours to dissolve mineral deposits.
- Use a toothbrush or small brush to scrub away any remaining buildup.
- Rinse thoroughly and reattach the shower head.
4. Replacing a Cracked Shower Head
If your shower head has visible cracks, it’s best to replace it entirely.
Steps:
- Unscrew the old shower head.
- Wrap plumber’s tape around the threads of the shower arm to ensure a tight seal.
- Screw on the new shower head securely.
- Turn on the water and test for leaks.
5. Fixing a Leaky Shower Valve
If water continues to drip from the shower head even when it’s turned off, the problem may be with the shower valve inside the wall. Replacing a faulty shower valve can be complex and usually requires shutting off the main water supply and accessing the plumbing inside the wall. If you suspect this is the issue, it’s best to call a professional plumber.
Preventing Future Leaks
To avoid future leaks and extend the life of your shower head, consider the following maintenance tips:
- Regular cleaning – Remove mineral buildup by soaking the shower head in vinegar every few months.
- Check washers and O-rings – Inspect these components annually and replace them as needed.
- Use plumber’s tape – When installing or reattaching a shower head, wrap plumber’s tape around the pipe threads to prevent leaks.
- Monitor water pressure – Excessively high water pressure can damage the internal components of the shower head and shower valve. If needed, install a pressure regulator.
DIY vs. Professional Repair
Some shower head repairs are simple enough for a DIY fix, while others require professional expertise. Use the table below to determine the best approach for your situation:
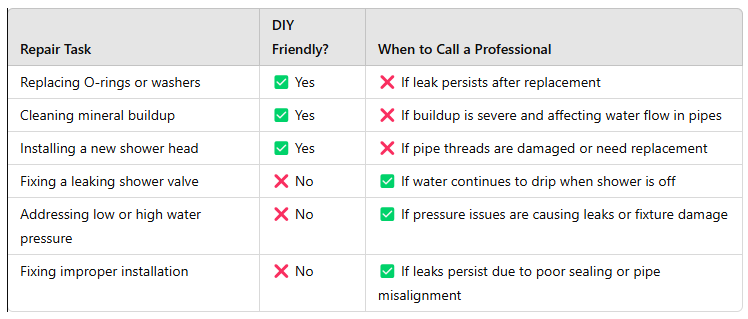
If you're unsure or the issue seems more complex, it's always best to consult a professional to prevent further damage and costly repairs.
Fixing a leaking Delta shower head can be a quick and easy process, depending on the cause. By performing regular maintenance and addressing small leaks early, you can prevent more significant plumbing issues down the road.
If you're in New Haven County and need assistance or suspect a more complex plumbing issue, don’t hesitate to contact A-Team Plumbing and Drain. Our experts can diagnose and fix your shower leak efficiently, ensuring your bathroom stays in top shape!